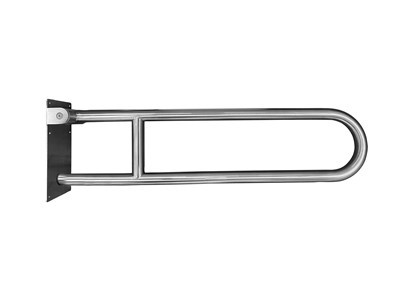
Installing a folding grab bar with leg can significantly enhance safety in areas like bathrooms, showers, or stairways. As a supplier of high - quality Folding Grab Bars with Leg, I'm here to guide you through the installation process step by step.
Why Choose a Folding Grab Bar with Leg?
Before we delve into the installation process, it's important to understand why a Folding Grab Bar with Leg is a great choice. Unlike a Straight Bathroom Grab Bar, a folding grab bar with leg can be folded away when not in use, which is ideal for spaces where space is limited. It provides the same level of support and safety as a regular grab bar but offers the added convenience of being out of the way when not needed. This makes it perfect for both residential and commercial settings.
Tools and Materials You'll Need
- Tools:
- Drill with appropriate drill bits (masonry bits for concrete or tile walls, wood bits for wooden walls)
- Screwdriver (both flat - head and Phillips - head may be required depending on the screws provided)
- Level
- Tape measure
- Pencil
- Materials:
- Folding Grab Bar with Leg
- Mounting screws and wall anchors (usually included with the grab bar, but double - check)
- Wall plugs (if needed for the type of wall you're installing on)
Step 1: Choose the Right Location
The first step in installing a folding grab bar with leg is to select the right location. This is crucial for both the functionality and safety of the grab bar.


- Bathrooms and Showers: In a bathroom or shower, the grab bar should be installed at a height that is comfortable for the user to reach. A general rule of thumb is to install it between 33 and 36 inches above the floor. Place it near the bathtub or shower entrance, on the wall where the user will need support when getting in and out.
- Stairways: For stairways, the grab bar should be installed along the handrail side, at a height that is easy to grip while ascending or descending the stairs. Measure the length of the area where you want to install the grab bar to ensure it fits properly.
Use a tape measure and pencil to mark the location on the wall. Make sure the marks are straight and level. You can use a level to double - check the horizontal and vertical alignment of your marks.
Step 2: Prepare the Wall
Once you've marked the location, it's time to prepare the wall for installation. The type of wall you're working with will determine the preparation method.
- Concrete or Tile Walls: If you're installing the grab bar on a concrete or tile wall, you'll need to drill holes for the wall anchors. Use a masonry drill bit and drill the holes at the marked locations. Make sure the holes are deep enough to accommodate the wall anchors. After drilling, insert the wall anchors into the holes.
- Wooden Walls: For wooden walls, you may not need wall anchors in some cases. However, if the wall is thin or you want extra support, you can use wall plugs. Drill holes at the marked locations using a wood drill bit, and then insert the wall plugs into the holes.
Step 3: Assemble the Folding Grab Bar with Leg (if required)
Some folding grab bars with leg may come pre - assembled, while others may require some assembly. Refer to the manufacturer's instructions that came with your Folding Grab Bar with Leg to assemble the parts correctly. This may involve attaching the leg to the main bar and tightening any screws or bolts.
Step 4: Install the Folding Grab Bar with Leg
Place the assembled grab bar against the wall at the marked location. Align the holes in the grab bar with the holes in the wall (or the wall anchors/plugs). Insert the mounting screws through the holes in the grab bar and into the wall anchors or wall plugs. Use a screwdriver to tighten the screws securely. Make sure the grab bar is firmly attached to the wall and does not wobble.
Step 5: Test the Folding Mechanism
After installing the grab bar, test the folding mechanism to ensure it works smoothly. Open and close the grab bar several times to make sure there are no obstructions or issues with the movement. Check that the leg of the grab bar provides stable support when the bar is in the open position.
Step 6: Final Checks
Once the grab bar is installed and the folding mechanism is working properly, perform some final checks. Use a level to make sure the grab bar is still level. Check the tightness of the screws again to ensure they haven't loosened during the testing process.
Tips for a Successful Installation
- Read the Instructions: Always read the manufacturer's instructions carefully before starting the installation. Different models of folding grab bars with leg may have specific installation requirements.
- Seek Professional Help if Needed: If you're unsure about any part of the installation process, especially if you're working with complex wall materials or have limited DIY experience, it's a good idea to seek professional help.
- Consider the User's Needs: When choosing the location and type of grab bar, consider the specific needs of the user. For example, if the user has limited mobility, you may want to install the grab bar at a lower height.
Conclusion
Installing a folding grab bar with leg is a relatively straightforward process that can greatly enhance safety in your home or commercial space. By following these steps and tips, you can ensure a successful installation. As a supplier of Folding Grab Bars with Leg, we offer a wide range of high - quality products that are designed to meet your safety needs.
If you're interested in purchasing our folding grab bars with leg or have any questions about installation or our products, we encourage you to reach out to us for a procurement discussion. We're committed to providing you with the best products and support to ensure your safety and satisfaction.
References
- Manufacturer's installation guides for folding grab bars with leg.
- General safety standards for grab bar installation in residential and commercial buildings.